

The OM-D EM-1 is equipped with HDR functionality built-in to the system. You can simply turn on this feature by using the HDR button that's available at the top left corner of the body as shown in this picture. By pressing this button, you'll have a variety of option to shoot for HDR such as:
- HDR 1 - Four shots are taken, each with a different exposure, and the shots are combined into one HDR image inside the camera with high contrast setting.
- HDR 2 - Four shots are taken (same as above), but the camera process the HDR images with low contrast setting.
- 3F 2.0EV - it will shoot with 3 Auto Exposure Bracketing images with 2.0EV (you will have -2, 0 and +2 EV)
- 5F 2.0EV - 5 AE BKT images with 2.0EV (-4, -2, 0, +2 and +4 EV)
- 7F 2.0EV - 7 AE BKT images with 2.0EV (-6, -4, -2, 0, +2, +4 and +6 EV)
- 3F 3.0EV - 3 AE BKT images with 3.0EV (-3, 0 and +3 EV)
- 5F 3.0EV - 5 AE BKT images with 3.0EV (-6, -3, 0, +3 and +6 EV)
Seems like you have a variety of HDR Auto Bracketing function to choose from, right? But all configuration above is useless for me. None of the setting above come close to the one that I've been doing all this while and the worse part is - I cannot customize the setting. I hope Olympus is reading this so that they would have an update to fix this issue.
What I really wanted is to shoot at 1.0EV for (at least) 7 Frames. If you can make it up to 9 Frame per 1.0EV is much more better!
What is HDR exactly?
HDR is short for High Dynamic Range. It is a post-processing task of taking a series of images, combining them, and do some adjustment to it so that it appears as what as our eyes see during that particular moment.
For me, the purpose of HDR is to create scenery that would reminisce, remind or recall that beautiful moment. If we shoot during sunset or sunrise, we want to remember that time during the sun is setting or rising up and the colors that was spreading throughout the sky – the yellow, red, blue, magenta and so much colors are there in the sky that has been painted by God for us humans to see and amazed at his creation. You want to capture it, share it with your friends and family; and be proud of yourself that you’ve manage to capture that priceless moment. So the image must be naturalistic so that it would be able to represent that moment.
HDR are not supposed to be like overcooked images with black spot, over saturated color and halo everywhere that seems like over edited by a Photoshop maniac. So, in order to get the naturalistic HDR images, you’ll need to shoot an exposure bracketing images with 1 frame for each 1.0EV.
Example: -4, -3, -2, -1, 0, +1, +2, +3, +4 (this represent 9 exposure bracketing)
By having these bracketing images, you would be able to capture the whole dynamic range from the darker part of the frame up to the brighter part of the frame. And when you merge this images in the post processing software (such as Photomatix) you’ll automatically get a balance histogram throughout the image. Plus you’ll notice that your image looks clean and natural without the need to adjust the settings like crazy. Trust me, I’ve done it so many times before and it just works - every time.
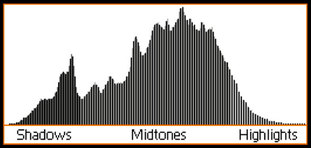
Sample of what I called a balance histogram
So, how do I shoot HDR bracketing with my E-M1?
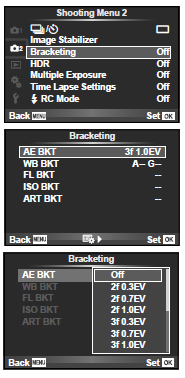
I have to manually configure the AE BKT (Auto Exposure Bracketing) by using in-menu setting. Inside the AE BKT setting, you have an option to choose from a variety of Frames and Exposure Value (see the picture below). For me, I'm using 7F 0.7EV (how I really wish they have 7F with 1.0EV setting).
After that, I need to shoot with a continuous shooting mode. In single-frame shooting mode, one photograph is taken each time the shutter button is pressed (I don't want this), while in continuous shooting mode (in Olympus they call it Sequential shooting mode), you can configure the camera to shoot from 2 or up to 10 frames per second (with AE BKT function turned on at 7F 0.7EV, I can only get up to 7 Frames of exposure bracketing - and that is exactly what I want!). But still, with the Sequential shooting mode, you are still required to press the shutter button all the way down until it finishes shooting all frames - I don't want this because it can create movement between frames (even though your camera is on the tripod) and it is tedious to arrange the images in post processing later on.
Here, you'll have two workaround:
By the way, I will always use Aperture mode at f8, with the lowest ISO setting (for this camera I choose ISO 200) every time I wanted to shoot for HDR. There is no need for Manual mode because since we are using AE BKT, let just the camera choose the best Shutter Speed for each Exposure Value.
I have to manually configure the AE BKT (Auto Exposure Bracketing) by using in-menu setting. Inside the AE BKT setting, you have an option to choose from a variety of Frames and Exposure Value (see the picture below). For me, I'm using 7F 0.7EV (how I really wish they have 7F with 1.0EV setting).
After that, I need to shoot with a continuous shooting mode. In single-frame shooting mode, one photograph is taken each time the shutter button is pressed (I don't want this), while in continuous shooting mode (in Olympus they call it Sequential shooting mode), you can configure the camera to shoot from 2 or up to 10 frames per second (with AE BKT function turned on at 7F 0.7EV, I can only get up to 7 Frames of exposure bracketing - and that is exactly what I want!). But still, with the Sequential shooting mode, you are still required to press the shutter button all the way down until it finishes shooting all frames - I don't want this because it can create movement between frames (even though your camera is on the tripod) and it is tedious to arrange the images in post processing later on.
Here, you'll have two workaround:
- Using a Custom Self Timer configured with 1 second, so the camera will take picture every 1 second; or
- Using Wifi function to remotely press the shutter button by using your mobile phone.
By the way, I will always use Aperture mode at f8, with the lowest ISO setting (for this camera I choose ISO 200) every time I wanted to shoot for HDR. There is no need for Manual mode because since we are using AE BKT, let just the camera choose the best Shutter Speed for each Exposure Value.
After all the hustle, finally I've manage to shoot my AE BKT images. Below is some of the HDR images that manage to capture at Putrajaya during sunset recently. These images has been post processed by using Photomatix Pro 5 and Adobe Photoshop CS6.
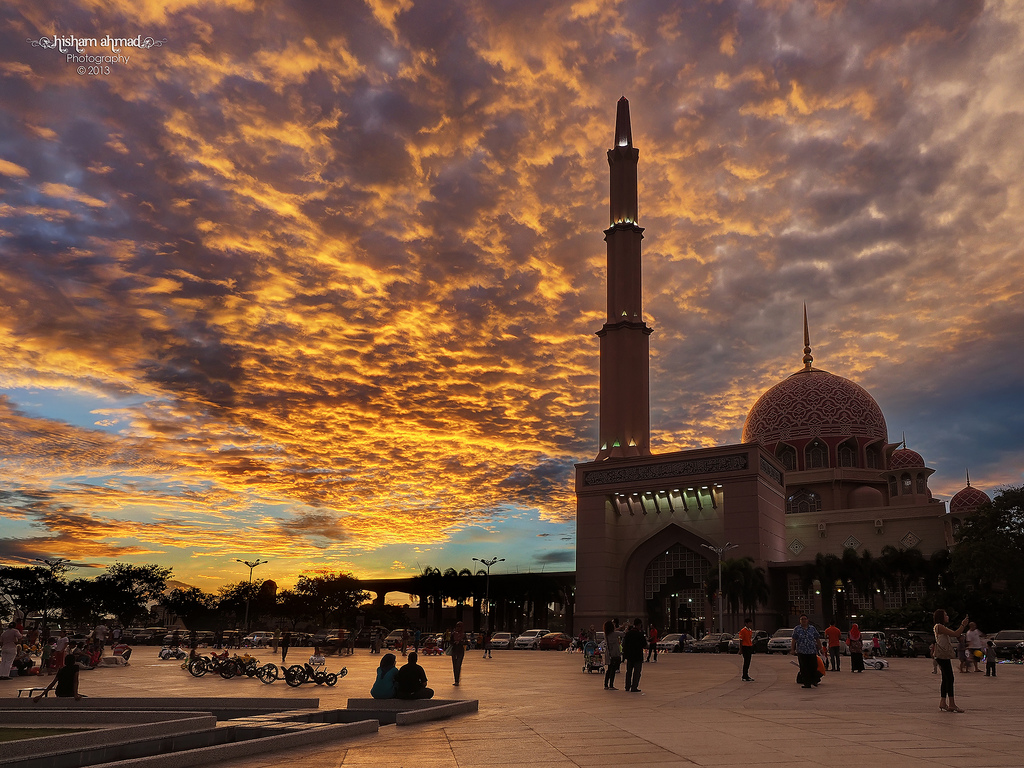
Click at the image to view large
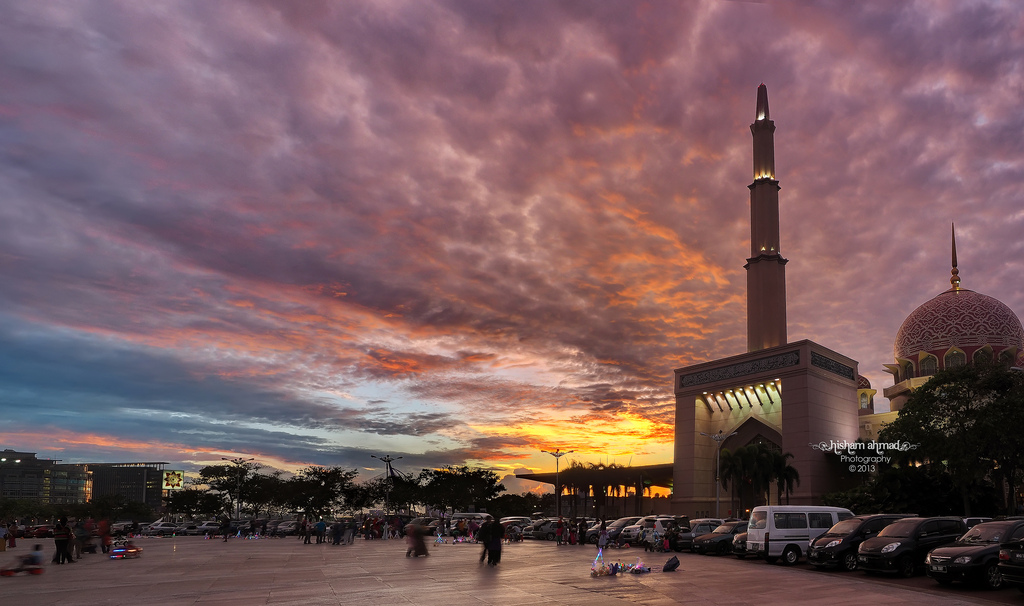
This is a panorama picture that I've created from total or 2 frames and one frame contains 7 exposures. Quite a tedious masking process because there was too much distortions (the smaller sensor that was trying to capture a wide angle scene can create too much distortion effects). Nevertheless, I've manage to fix it - manually.
So that's about it. If you have any questions about HDR or anything about E-M1, feel free to contact me. Thanks!
 RSS Feed